CAD 2

CAD 2 is a class that is a continuation of CAD 1. It continues to teach the basics and more complicated parts of the the platforms Onshape, Autocad and Revit. The course covers mechanical drawings, a manufacturing presentation, problem solving week, 2D Autocad, 3D Onshape part drawings, as well as 3D Onshape assembly drawings. The opportunity to 3D print an assembly also was provided. The course goes more into depth about constructing more difficult parts that require more in depth detail and dimensions for drawings.
Mechanical Drawings
Mechanical drawings are layouts for something being constructed, on paper using specific precision drawing instruments. They typically start out with a piece of paper on a drawing board and a T square to make precise and straight lines. I enjoyed the time we spent doing mechanical drawings, but sometimes it was difficult to not mess up the paper with stray marks or mistakes. It's much easier to be exact using the computer programs. The following examples demonstrate an isometric view of a part, followed by a top view of a classroom, and then an assembly isometric-exploded view drawing.


|

|
Presentation
Just like in CAD 1, in CAD 2 we were assigned to complete a presentation. We had to pick a manufacturing process, I chose to do sand casting since I had experience first hand with it in metal class, making a clamp. We had to cover a variety of questions about our topics such as the uses, the background and history, how to do it, how it could be used in the future, and a full overview on what it is. In the images below I've inserted my presentation slides.


|


|


|


|
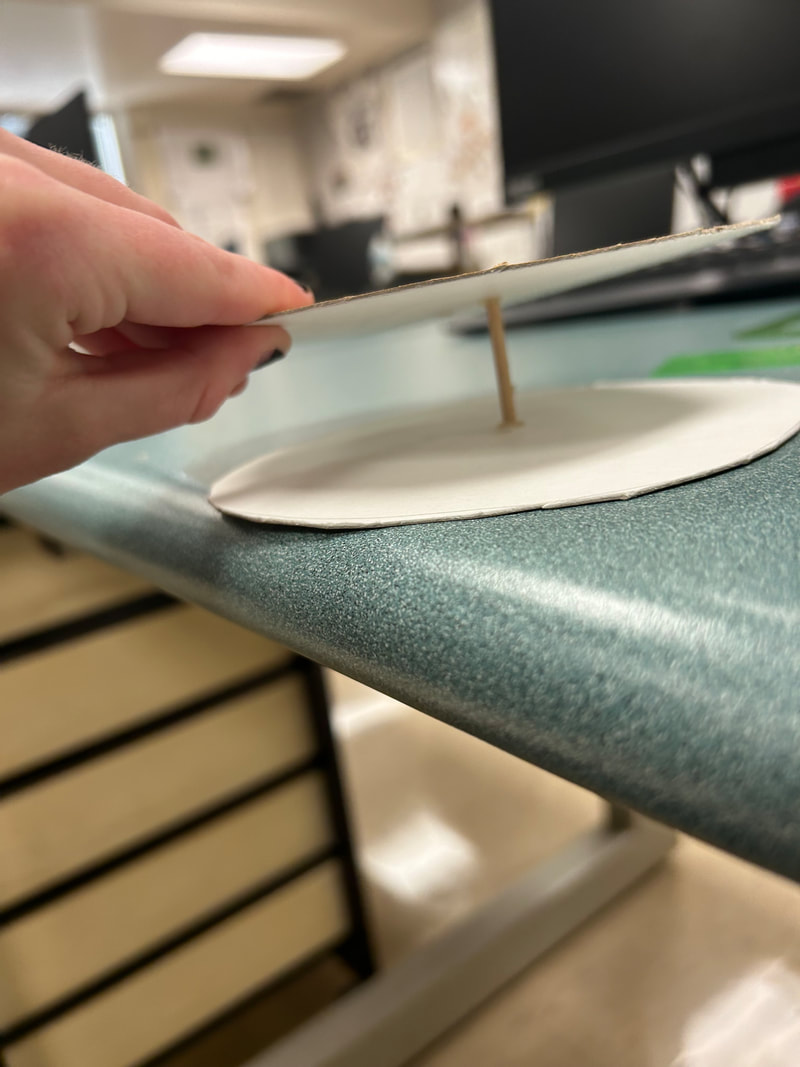
Problem Solving Week
During problem solving week we were tasked with the objective of creating something that rolls down a ramp at the slowest time from top to bottom. The ramp had no sides so it had to stay on the track. For this I created two large wheels out of cardboard, and hot glued them to a wooden dowel rod down the center. This worked well because the big wheels turned slowly and kept it on the track. Finding out how to make the object more successful and problem solving after each try was fun. I enjoyed problem-solving week and found it exciting.

|
|
2D CAD - Autocad
Autocad is a program where we create layouts for something being constructed. 2D CAD is the 2D version of the layouts that we create. This was my least favorite program to use, because it was more difficult to navigate than the other websites, such as Onshape or Revit. There's less automated features and mistakes are much more prone to being missed. Navigating the program definitely takes some time to get used to but once you get the hang of it its not a bad software to use and it gets the job done. In the following examples, I drew a gasket, a wheel, and a "switch-dog" as an orthographic projection view.

|

|

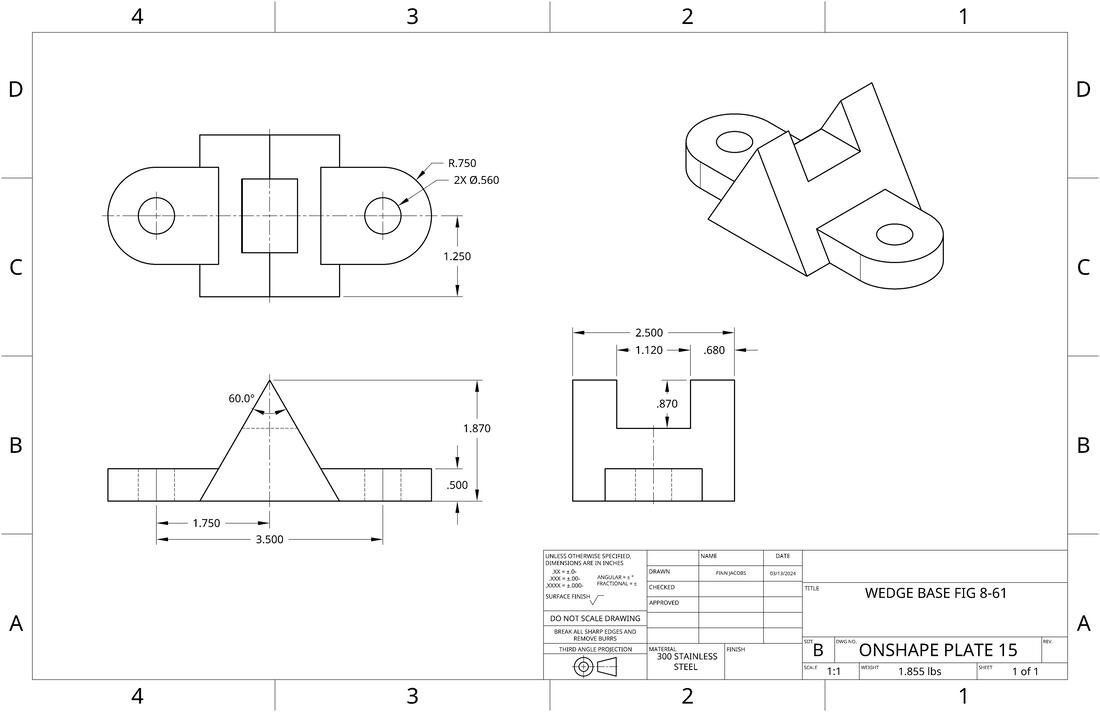
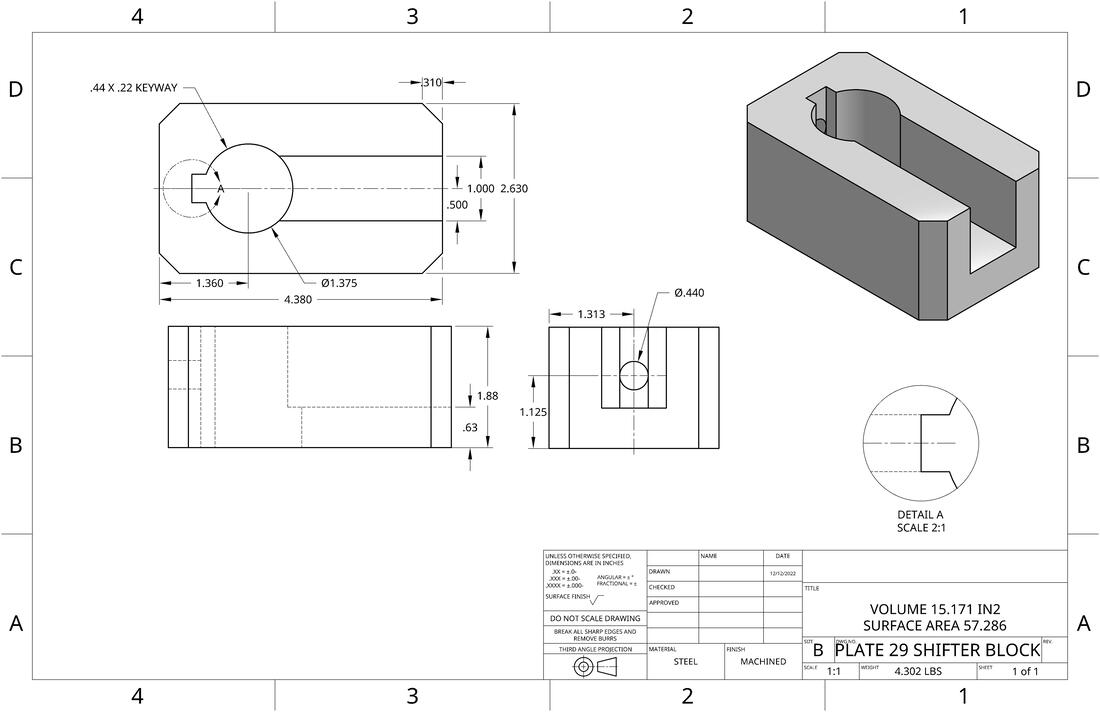
3D CAD - Onshape
Onshape is the web-based program that we use for 3D CAD. We do the same thing where we create layouts for something to be constructed. We constructed many parts with this program, and it is my favorite to use out of the other programs we have used during the course. You first start off with a sketch and then turn the sketch into a 3D model. You can create multiple parts and put them together to create assembly's. The continuation of Onshape in CAD 2 was more difficult than CAD 1. The objects we had to draw were much more detailed and required more precision and were more difficult to draw. I enjoyed the Onshape drawings the best because I enjoyed using the web-based software and found it easier to use than some of the other software we previously used. The following example below depict 5 orthographic part views, 1 auxiliary view, a plate and bolt assembly, as well as a caster assembly.


|


|
Choice Assembly Drawing
After doing the 1st assembly we were given the choice to do an assembly of our choice. I chose the stuffing box (figure 6-32) assembly drawing in chapter 16 of our book. It consists of 3 parts, the bearing, the lock nut, and the packing nut. In the following images, I drew an orthographic drawing for each part, and the assembly of how the parts fit together.

|

|

|

|
Concrete Project
For my concrete project I created a planting pot for a large plant or tree. This was the first time I used concrete and it was a little harder than I expected it to be. It didn't stick as much and work as I had thought it was going to. I used a beach ball to mold the concrete around and then used some Styrofoam balls to decorate it a little. Concrete is a difficult substance to work with, and can be hard to not make mistakes with.

|

|

|
Extras
Rather than doing the architecture project I chose to do an assembly, as shown in the pictures above. We were also allowed to 3D print an assembly as well. I designed an articulated hammer head shark in 5 parts that link together using ball and socket joints. I designed this on Tinkercad, and then 3D printed it on a creator pro.


|


|
CAD 2 Reflection
In CAD 2 I further learned how to use my CAD skills to create more complicated drawings and assembly's. I liked that we were able to 3D print and I liked using Onshape. I wasn't the biggest fan of the concrete project but it was good experience. Previously, I had not used concrete before. I liked problem solving week and it was fun to brainstorm and come up with ideas and then execute them. Overall my favorite part was the Onshape drawings, some of them were difficult but I like the program and enjoyed using it. I now think more deeply into the parts that fit together to create an assembly.
